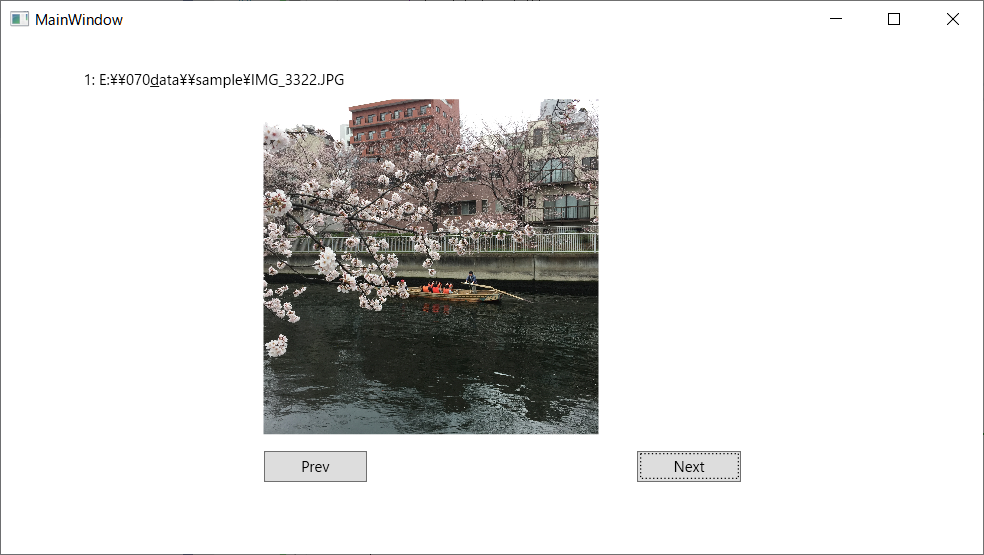
Day2 : Design the view / functions.
Day1 Achievement.
Design the functions.
- Again, what to make as
DL_Viewer? Raughly designed. - Positioning
DL_Vieweras red-colored below.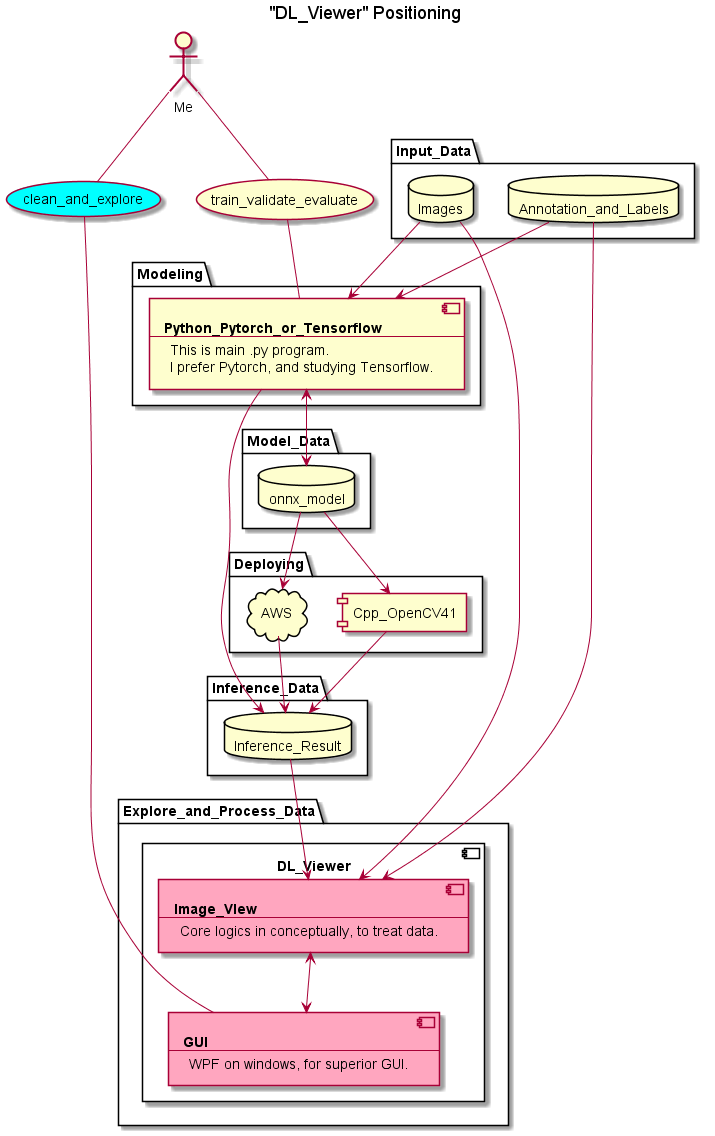
Design the view next.
Now focusing on a view for one image.
After, I will consider about multi-displaying images or some kind of summary result, etc.
| No | item | requirements | Achievement |
|---|---|---|---|
| 1 | Displaying Image | If whole image is visible? Or selectable to pinch in-out? | Default image cotroll setting with Grid layout, which is enough for resize behaviour. |
| 2 | Choose directory | Add directory to browse, using directory control. | Done. (It was easy.) |
| 3 | Annotation/label Info | Draw rectangle, and show label. | Done wih pure C# libs, not using OpenCVSharp. |
| 4 | Viewer improvement | Sort for view order. View position, and its' controller. |
Set Slider for view control. |
| 5 | Detailed Information | Show detailed information for one image displaying. | TreeView Control to show those multiple objects. |
| 6 | Folder control | It's bothersome to choose 2 folders one by one. Something like shortcut will be. | ListView to change simulteneously. |
Implementation
-
Displaying Image
- It is resized by default, and it's ok for me now.
- For about layout, grid layout.
- It is not so complexed, but can place parts as a certain degree.
- TBD: Grid Layout effect.
-
Choose directory
-
Add directory to browse, using directory control.
```cs private void MenuItem_Click(object sender, RoutedEventArgs e) { FolderBrowserDialog fbd = new FolderBrowserDialog();
fbd.Description = "Specify the folder to explore.";
fbd.RootFolder = Environment.SpecialFolder.Desktop;
fbd.SelectedPath = @"E:\070_data";
fbd.ShowNewFolderButton = true;

DialogResult dres = fbd.ShowDialog();
if (dres == System.Windows.Forms.DialogResult.OK)
{
    files = Directory.GetFiles(fbd.SelectedPath, "*.JPG").Concat(Directory.GetFiles(fbd.SelectedPath, "*.JPEG")).ToArray();
    ind_files = 0;
    UpdateImage(0);
}
fbd.Dispose();
}
`` * When pressOK, it make list of.JPGand.JPEGfiles. * Added this code withMenuItem`, but this is ok with other controlls, such like button.
-
-
Annotation/label Info
-
Draw rectangle of annotation.
- There are many Bitmap containers on C#.
- My solution,
- Load image
System.Windows.Media.Imaging.BitmapImage
- Convert to Bgr24 type.
- Copy to WriteableBitmap
System.Windows.Media.Imaging.WriteableBitmap.
- Modify
- by Lock(), direct memory access, Unlock().
- use
unsafe{}block with "allow execute unsafe code" project option.
- Load image
-
Relative code are velow.
```cpp // load image var source = new BitmapImage(); source.BeginInit(); source.UriSource = new Uri("file://" + files[ind_files]); source.EndInit();
// convert to Bgr24 Type FormatConvertedBitmap source_bgr24 = new FormatConvertedBitmap(source, PixelFormats.Bgr24, null, 0);//Correspond to monochrome images.
// Copy to WriteableBitmap WriteableBitmap writeable_image = new WriteableBitmap(source_bgr24);
// Modify writeable_image.Lock(); unsafe { int byte_per_pixel = 3;//When Bgr24
// Get a pointer to the back buffer.
int pBackBuffer = (int)bmp.BackBuffer;

// direct memory access
// jj: loop variable for y axis
// ii: loop variable for x axis
*((int*)(pBackBuffer + bmp.BackBufferStride * jj + ii * byte_per_pixel + 0)) = (byte)0;
*((int*)(pBackBuffer + bmp.BackBufferStride * jj + ii * byte_per_pixel + 1)) = (byte)0;
*((int*)(pBackBuffer + bmp.BackBufferStride * jj + ii * byte_per_pixel + 2)) = (byte)255;// make dot(x, y) = (ii, jj) to red.
} writeable_image.Unlock(); ```
- To do this, it is good as simple just using
standard C#, withoutOpenCVSharpetc.
- To do this, it is good as simple just using
-
XML parser
-
I use below for parsing xml document which has coordinates and labels.
cpp
using System.Xml.Linq;//for XDocument
xml = null;
try
{
    xml = XDocument.Load(file path).Element("Top node for start seeking");
}
catch(FileNotFoundException)
{
    //xml file missing
    label1.Content = "xml file missing";
}
if (xml != null)
{
    foreach (var row in xml.Elements("2nd node to loop"))
    {
        something_X = row.Element("3rd node to get info").Value;
    }
}
4. Viewer improvement
-
-
View position, and its' controller.
- Choose
Slider Cotrolto expolore files. - Bindings
- It needs files.length must be changeable after specifying the annotation folder.
- So it needs transform the value range from 0-1 to 0-(files.Length-1).
- Ideal solution
- Use
Binding.Converter property, with data type ofSystem.Windows.Data.IValueConverter.
- Use
- My solution, Binding tricks
- Bind
SliderandTestBox. - Set
Slider'sMaximum="1", so the value range is 0 to 1. - I want to show image no which is 0 to
files.Length- 1, onLabel2. - Then I use trick,
- Hide
TestBox - update
Labelswhen Slider changed. ```cpp private void Slider_ValueChanged(object sender, RoutedPropertyChangedEventArgse) { int ind_jump = (int)(e.NewValue * (files.Length - 1) + 0.5); label2.Content = ind_jump; UpdateImage(ind_jump - ind_files);} ``` * UpdateImage() is the helper function to update image and write rectangles when xml exists. (I pass to explain here.) 1. Sort for view order. * I pass this function. * This will be done after Inference functions are available.
- Hide
- Bind
- Choose
-
-
Detailed Information
- Show detailed information for one image displaying.
TreeView-
Replace DataContext as below. ```cpp List
treeData = new List (); TreeViewItem treeNode = null; TreeViewItem treeLeaf = null;
treeNode = new TreeViewItem(); treeNode.Header = "xml file missing";
treeLeaf = new TreeViewItem(); treeLeaf.Header = labelFolder + str2;//xml file name of mine. treeNode.Items.Add(treeLeaf);
treeData.Add(treeNode);
//treeView 置き換え treeView_labelinfo.DataContext = new { TreeData = treeData }; ```
-
- Show detailed information for one image displaying.
-
Folder control
- Code for folder control.
-
The instance of
ObservableCollection<DataContainer>should be made by auto, by seeking folder name etc. ```cpp public class DataContainer { public Int32 Id { get; set; } public string Title { get; set; } public string ImageFolder { get; set; } public string LabelFolder { get; set; } }ObservableCollection
ImageNetObjectLocalizationChallenge = new ObservableCollection (); OptWin.listView_DataContainer.DataContext = ImageNetObjectLocalizationChallenge; DataContainer item = new DataContainer { Id = 0, Title = "sample", ImageFolder = @"E:\070_data\sample", LabelFolder = @"E:\070_data\sample" }; ImageNetObjectLocalizationChallenge.Add(item);
item = new DataContainer { Id = 1, Title = "ILSVRC validation", ImageFolder = @"E:\070_data\imagenet_object_localization\ILSVRC\Data\CLS-LOC\val", LabelFolder = @"E:\070_data\imagenet_object_localization\ILSVRC\Annotations\CLS-LOC\val" }; ImageNetObjectLocalizationChallenge.Add(item); ```
-
Achievement
-
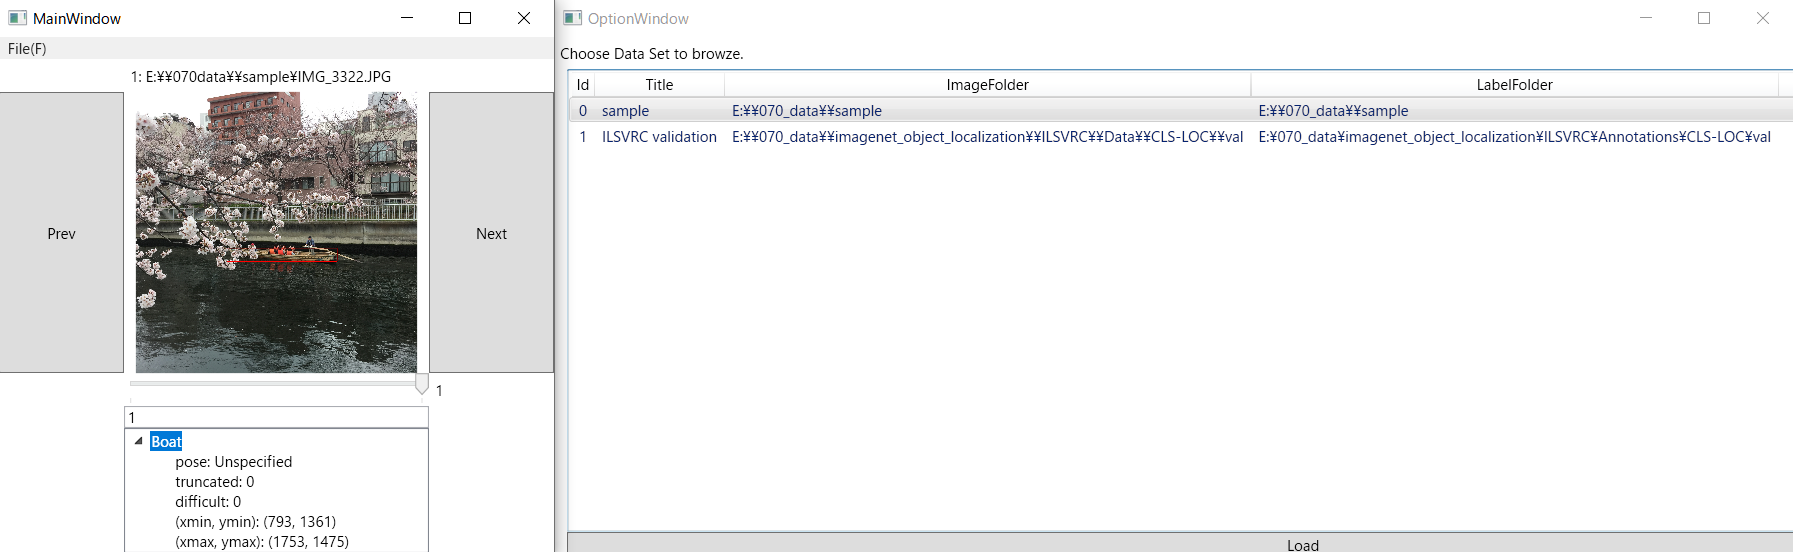
Latest viewer looks.
- Left : MainWindow
- Add menu list.
- Can specify folder one by one.
- Arrange layout as gridlayout.
- Add slide bar for browsing.
- Text box under slide bar is a Binding trics for updating slide bar.
- Add TreeView for deteiled info.
- Can show multiple objects by TreeView.
- Add menu list.
- Right : OptionWindow
- Add ListView for manage folders.
- Add load button to change folder sets.
- Left : MainWindow
-
This would be something for browsing data and labels!
Feature Work
- I will use this by myself, and want to keep updating.
- Add the view-function of inference result and its statistics.
- Fix that these code are not on ideal MVVM architecture.